→Background
I recently got the chance to completely reset my Windows 10 machine, and took advantage of the opportunity to create a dev environment I would love. These were my high-level goals:
- Make WSL my primary dev environment
- Use VSCode as my primary editor
- Have a beautiful terminal
→WSL & VSCode
To achieve this, I started by installing WSL 2. I went with an Ubuntu distro because that's what I've had the most experience with in the past. You can find instructions on installing WSL and/or upgrading it to WSL 2 in the official docs.
Next I installed VSCode, and the Remote Development extension pack which is where things start to get fun. With this extension pack installed, you can edit files in the WSL filesystem seamlessly with VSCode.
→Windows Terminal
To get my beautiful terminal going, I installed Windows Terminal (WT), which is an awesome new terminal experience for Windows from Microsoft.
Although I wanted WSL to be my primary dev environment, I still wanted working in Windows to be a nice experience as well, so I wanted to make sure my PowerShell terminal was great too. To get that going, I also installed the latest PowerShell 7.
Now it was time to setup my WT profiles. By default, WT creates a profile for WSL, PowerShell, cmd,
and Azure Cloud Shell. I'm not interested in using cmd or Azure Cloud Shell, and I'm going to be
using PowerShell 7 instead of PowerShell, so I disabled all but the WSL shell. To do this, simply
add the "hidden": true property to the profiles in the WT settings file (click the dropdown in the
header bar and then Settings or Ctrl+,).
→PowerShell WT Profile
Now to create my PowerShell 7 profile, I added the following object to the profiles array:
{
  "guid": "{346d54ee-6282-41c7-846a-0a2fa38ff66b}",
  "name": "PowerShell",
  "commandline": "pwsh.exe",
  "icon": "%SystemRoot%\\Installer\\{8B844F39-E6EE-486B-BE85-96A485AE2B96}\\PowerShellExe.ico",
  "startingDirectory": "D:\\code"
}
A few things to note:
- To generate a GUID, you can use the Online GUID Generator website
- I am using the
pwsh.execommand instead ofpowershell.exeto use PowerShell 7 - Follow these steps to find the icon path on your system:
- Open your Start menu and search for PowerShell 7
- Right click on the app and click "Open file location"
- In the file explorer that opens, right click the shortcut and click "Properties"
- On the "Shortcut" tab, click the "Change Icon..." button and copy the file path
- I like to set the starting directory to be where I keep all my projects, and ideally this is near the root of a drive to keep file paths as short as possible
→Ubuntu WT Profile
Since I want to make WSL my primary environment, I moved its profile object to the top of the list
so that it will appear first in the new tab dropdown. Then I replaced the top-level defaultProfile
property with the WSL profile's guid property to make it the profile that is opened automatically
when WT launches.
Similarly to PowerShell, I wanted the starting directory to be ~/code. If you try setting that
directly in the WT configuration, you'll find it doesn't work because WT doesn't know how to resolve
it. You can use an absolute path to get there instead, and you need to use a Windows file path that
WT can understand. You can access a WSL distro's file system from Windows using \\wsl$\<distro>, so, I added this property to the Ubuntu profile object: "startingDirectory": "\\\\wsl$\\Ubuntu\\home\\blake\\code" (where Ubuntu should be replaced with the name of your WSL
distro and blake with your WSL username).
→WT Theme
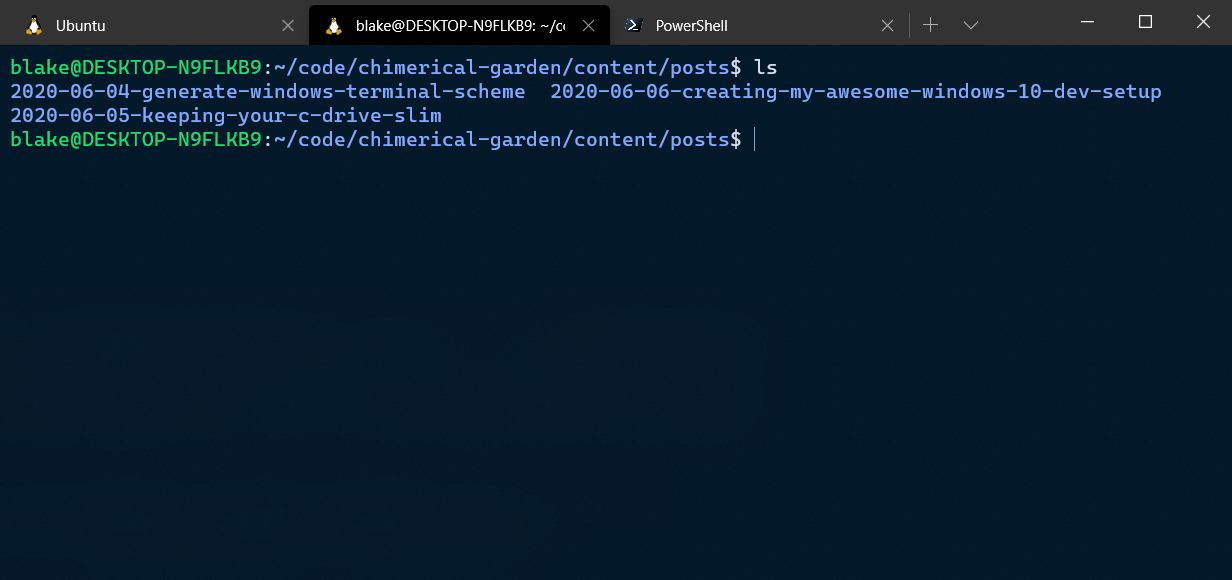
Finally, I wanted to get a new theme for my WT. I decided I would like to use the same colour scheme as I was using for VSCode at the time, which was the Night Owl theme. So (naturally), I created a VSCode plugin to automatically generate a WT theme.
Here's what my terminal looks like with the Night Owl theme:
→Shell Profiles
Next up I wanted to get my shell profiles started. We'll iterate on these more later on. Your shell profile is a script that gets run when the terminal starts which can be used to configure the current environment. For PowerShell, this will be a PowerShell script and for WSL it will be a bash script.
→PowerShell Profile
Let's start with PowerShell again. You can run echo $PROFILE to see if a profile script already
exists. For me it did, and it was located at
C:\Users\blake\Documents\PowerShell\Microsoft.PowerShell_profile.ps1. If it doesn't exist for you,
it's not a big deal. It seems that PowerShell looks in a variety of
places and you
can just create a script in the appropriate place and it should work. Here's what I added to my
profile script:
# C:\Users\blake\Documents\PowerShell\Microsoft.PowerShell_profile.ps1

Set-Alias -Name editor -Value nano
Set-Alias -Name edit -Value editor

function profile_alias { editor $PROFILE }
Set-Alias -Name profile -Value profile_alias

function reload_alias { & $PROFILE }
Set-Alias -Name reload -Value reload_alias
Let's break this down a bit. First of all, I am creating a couple aliases (editor and edit) for
my in-terminal editor. I prefer to use a terminal editor instead of a GUI editor because it reduces
context switching when working in the terminal, and is much faster to load the file to make a quick
edit. That said, if you wanted to use VSCode, you could replace nano with code.
The reason I create an alias for my editor command is so that I can change the editor at any time and not have to change my muscle memory to use the new command. It also means I can create more aliases that open the editor without having to change all of them if I change my editor.
Next, I add the profile alias which opens the profile script in my editor (the editor alias is
already coming in handy!). This is great because now I don't need to remember where my profile is
ever again, I can just run profile and can start editing it right away. I also add a reload
alias which simply reloads the shell using the profile script. This lets me use my changes to the
profile script without having to create a new terminal instance.
→Bash Profile
Now let's do the same thing for bash. In bash, the profile is a bash script located at ~/.bashrc.
By default it contains a lot of stuff already, so I like to add my changes to the bottom of the
script. Here's what I added:
# ~/.bashrc

export EDITOR="nano"
alias editor="$EDITOR"
alias edit="editor"

export PROFILE="~/.bashrc"
alias profile="editor $PROFILE"
alias reload="source $PROFILE"

alias explorer="explorer.exe"
This is very similar to the PowerShell script. First, we create an EDITOR environment variable.
Some Linux programs respect the EDITOR variable, so it's a good idea to set it if you want more
programs to know which editor you want to use. Then we use EDITOR to create our editor and
edit aliases just like before.
Then, I add the same profile and reload aliases to edit and reload the profile script.
Finally, I added another alias which maps explorer to explorer.exe which makes it the same
command for opening the Windows File Explorer in WSL as in PowerShell.
→Terminal Editor
Let's revisit our terminal editor. I started with nano because it's a pretty intuitive and easy to use editor for terminals. I don't have a lot of terminal editor experience, so I'm not very handy with Vim, and even nano can be a bit awkward to use.
So, I did a bit of research to see if there were any editors that had more similar keyboard shortcuts and navigation to a modern GUI text editor, like VSCode. I found micro which is available cross-platform, which is perfect!
→PowerShell Editor
Let's install it. In PowerShell, it's most easily installed via scoop or
Chocolatey. If you don't have either installed yet I'd highly recommend
you do, as it makes installing programs in Windows a much easier experience. I'm going to use scoop
for the purposes of this guide. With scoop installed, simply run scoop install micro. Now you can
run micro to edit your files.
Let's update our profile script to use it:
# C:\Users\blake\Documents\PowerShell\Microsoft.PowerShell_profile.ps1

Set-Alias -Name editor -Value micro→Ubuntu Editor
To install on Ubuntu, we can run the install script from the micro website:
curl https://getmic.ro | bash
Now we can update our bash profile to use it:
# ~/.bashrc

export EDITOR="micro"
→Micro Theme
One issue you might notice once you start editing in micro is that it's theme clashes with your WT
theme. One option could be to port your WT theme to micro, but this is quite a bit of work. I found
using the built-in simple theme uses your terminal theme's background colour and seems to fit
quite well for me.
To do this, you'll have to configure micro for PowerShell and WSL separately. To configure it, open
micro, press Ctrl+E to open the command prompt, then enter the command set colorscheme simple.
→Terminal Prompt
Finally, to make our terminal really pretty, we need to customize the prompt. There's lots of options out there for this, but the most popular one seems to be ohmyzsh for Bash and oh-my-posh for PowerShell. I'm not a huge fan of these because in my experience they slow down the terminal to a point which makes me frustrated to use them, and since they are separate solutions for each environment they must be configured separately.
Enter Starship, a "blazing-fast," cross-platform alternative with a delightfully simple prompt and some awesome customization (with the promise of even more coming in future releases). Since WSL and PowerShell both have access to the Windows filesystem, we can even store the Starship configuration in a central place and have both pull from it.
→PowerShell Starship
To install Starship for PowerShell, we can again use scoop: scoop install starship. To load
starship, we again need to edit our profile (now with our snazzy editor and single-command alias):
# C:\Users\blake\Documents\PowerShell\Microsoft.PowerShell_profile.ps1

Invoke-Expression (&starship init powershell)
Now we can run our reload alias and see the beautiful prompt immediately.
→Bash Starship
Installing Starship for Bash is just as easy. First run the bash install script from their website:
curl -fsSL https://starship.rs/install.sh | bash
Then add its init script to our profile:
# ~/.bashrc

eval "$(starship init bash)"
Enter reload and we can see it in bash now too.
→Powerline Fonts
One problem you may see at this point is that some icons in the prompt don't render correctly. To
fix this, we need to configure a Powerline font for WT. The default WT font is Cascadia Mono.
Cascadia is a font family which comes in the variants:
- Cascadia Mono - Cascadia without programming font ligatures
- Cascadia Code - Cascadia with programming font ligatures
- Cascadia (Mono|Code) PL - One of the above with Powerline symbols
By default, Cascadia Mono and Cascadia Code are installed, but you'll have to download and install the Powerline variants yourself from their GitHub Releases.
You could use any other Powerline font you like, but I think Microsoft did a great job with this one.
Once the font is installed, you can open your WT settings file and add the "fontFace": "Cascadia Code PL"
property to the profiles.defaults object. (I also like the programming font ligatures so I am
using the Code variant. If you don't like the ligatures, use the Mono variant instead).
→Starship Configuration
To configure Starship the same on PowerShell and WSL, we'll start by creating the configuration file in the Windows filesystem for PowerShell, then create a symlink in the WSL filesystem. You could also do it the other way around, but I think this is better for a couple reasons:
- It's easier to create symlinks in Linux than in Windows
- You could add or remove your WSL distros in the future, so having the configuration in Windows means it can be used by multiple WSL distros at once, and it won't be deleted if you remove a WSL distro in the future
Starship looks for its configuration file in ~/.config/starship.toml by default. In PowerShell,
~ resolves to C:\Users\<username>, so we can run the following commands to create our
configuration file:
mkdir ~/.config  # It's possible this already exists, especially if you've installed micro
touch ~/.config/starship.toml
Now you can add whatever configuration you'd like here. I personally don't like all the extra newlines they have on by default, and I also don't like a couple of the modules they enable by default, so this is what my configuration looks like:
# ~/.config/starship.toml

add_newline = false

[line_break]
disabled = true

[package]
disabled = true

[nodejs]
disabled = true
I'd encourage you to try out the default settings first to see how you like them before making these changes though.
Finally, we need to sync these changes to WSL. In bash, you can run these commands to create the symlink:
mkdir ~/.config  # It's possible this already exists, especially if you've installed micro
ln -s /mnt/c/Users/<username>/.config/starship.toml ~/.config/starship.toml
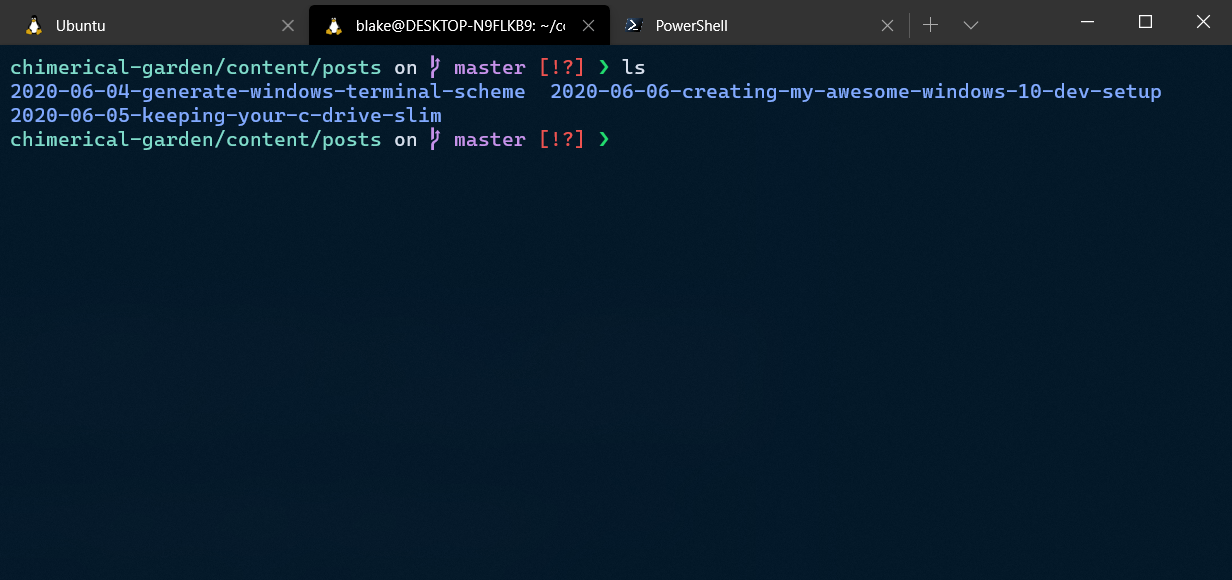
Here's what my terminal looks like now with starship running:
→Conclusion
It's getting easier and easier to create a beautiful and functional dev environment in Windows 10 these days. I hope this guide was useful to you and that you learned a few new things along the way (I know I sure did).
Happy coding!